DevContainers

In my daily work I code a lot on a quite a few different projects. Mostly in C# and TypeScript, and a bit of Go.
However, jumping between many projects I often have trouble with my machine not conforming to the particulars needed by a particular project. Maybe it needs a special version of node or npm, maybe some specific version of dotnet. This becomes troublesome and aggravating.
My solution, these days, is to include the environment that the project needs within the source-code. I use Visual Studio Code (#vscode) as my integrated development environment (#IDE), and it supports a wonderful way of doing this called #devContainers.
To the best of my knowledge only vscode and Visual Studio (but maybe only for C++?) supports devcontainers yet, which is a shame. Devcontainers has moved out of vscode, and is now available as a set of command-line tools. I hope other IDEs start supporting devcontainers soon (looking at you, Rider)!
How to do it?
I’m not going to go through how devcontainers work under-the hood, but this is how to use it from vscode on a windows host.
In your project you add a file .devcontainer/devcontainer.json that describes how you want your environment to be set up. I just use the wizard in vscode for this by launching the >Add devcontainer files -command.

The Add Dev Container Configuration Files -command in vscode
This takes me through a few questions (what do I want in the devcontainer) and sets up the file.
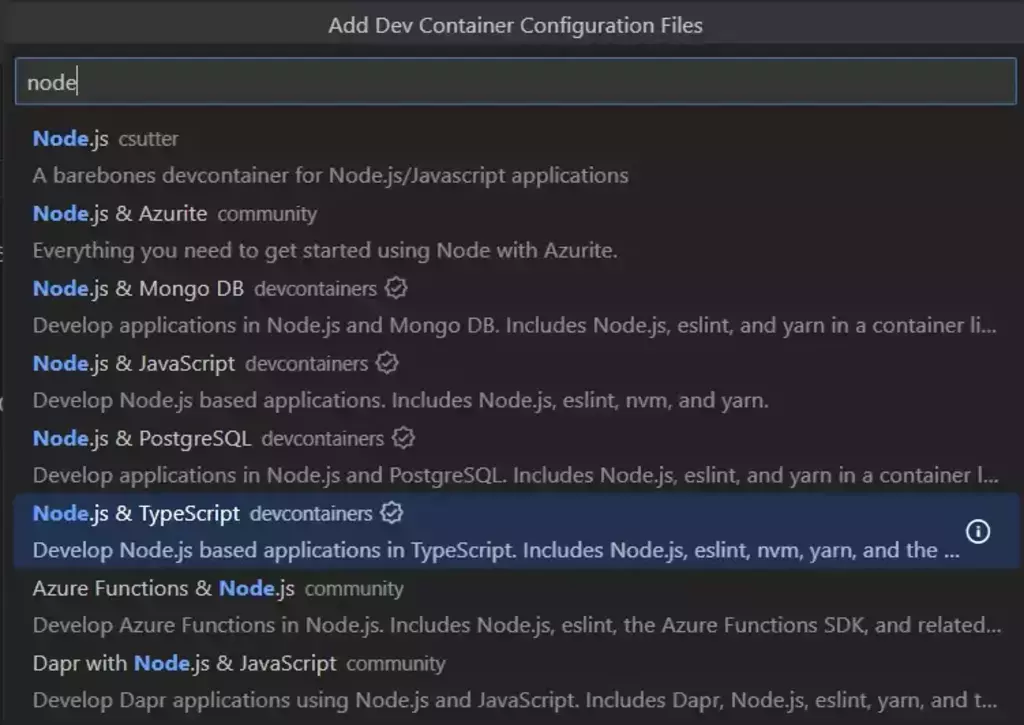
searching for “node” as a starting-point
This is an example of a basic one for Node and Typescript with the GitHub CLI pre-installed:
// For format details, see https://aka.ms/devcontainer.json. For
// config options, see the
// README at:
// https://github.com/devcontainers/templates/tree/main/src/typescript-node
{
  "name": "Node.js & TypeScript",
  // Or use a Dockerfile or Docker Compose file.
  // More info: https://containers.dev/guide/dockerfile
  "image": "mcr.microsoft.com/devcontainers/typescript-node:0-18",
  "features": {
    "ghcr.io/devcontainers/features/github-cli:1": {},
    "ghcr.io/devcontainers/features/node:1": {}
  }

  // Features to add to the dev container. More info:
  // https://containers.dev/features.
  // "features": {},

  // Use 'forwardPorts' to make a list of ports inside the container
  // available locally.
  // "forwardPorts": [],

  // Use 'postCreateCommand' to run commands after the container is
  // created.
  // "postCreateCommand": "yarn install",

  // Configure tool-specific properties.
  // "customizations": {},

  // Uncomment to connect as root instead. More info:
  // https://aka.ms/dev-containers-non-root.
  // "remoteUser": "root"
}
When you open a folder with vscode that has this file present you will be asked whether you want to re-open the folder in a devcontainer. Do this and the container described will be built for you and will run, your vscode instance will connect to it and you can do all your development in there without affecting your host machine.
I use this to re-create known good environments all the time, and to be able to install whatever tools and things I want inside the devcontainer, knowing that I can re-build it at any time to bring it back to the known good state.
Features
Once you’ve selected a starting devcontainer-definition you can add features to it. If your starting-definition is just Linux Alpine, but you want it to have e.g. Yarn you could add this here. There are many features already available, or you could make your own.
I usually write things that end up as docker-images, and also run several containers that my code depends on (runtimes, databases, etc). To do this without affecting my host-machine’s setup I like the docker-in-docker -feature. With this I can run docker within the devcontainer and not have that conflict with whatever I’m running on my host-machine.
Mostly I work with git-repositories hosted on GitHub, and the command-line-interface tool for that can be included as a feature, very nice.
The features are installed after the docker-image is downloaded and running, so they add some time to your first startup, or re-build of your devcontainer. This is why I usually select a devcontainer-definition that includes most of what I need, instead of going from a basic one and adding features.
Tips
Here are a few tips if you want to try out running in devcontainers yourself (in particular if your host-machine is a windows-machine):
Give WSL resources
You’re going to be running (probably) a lot of things in docker through windows-subsystem-for-linux (WSL), and you probably want to give it a bit of head-room. To do this you make a file in your user-profile directory called .wslconfig (or edit it if it’s already there):
# on your windows-machine
> notepad "$env:USERPROFILE\.wslconfig"
By default WSL gets access to all your computer’s cores and half of its memory. In my experience that is too many cores and not enough memory. If you (like me) want to give your devcontainer access to 32GB of memory and 12 processor-cores the file, releasing memory back to the host when available – it can look like this:
[wsl2]
memory=32GB
processors=12
pageReporting=true
Use git credentials
You probably already have your git ssh-keys set up on your host-machine, and don’t want to go through that every time you re-build a devcontainer. To have your devcontainer “inherit” the credentials from your host-machine you need to set up a service in windows that it can access. Note: this is for accessing git through https, not the git-protocol.
# on your windows host-machine
$ Set-Service -Name ssh-agent -StartupType Automatic
$ Start-Service ssh-agent
# check that it's running
$ Get-Service ssh-agent
Now the ssh-agent is running and you can tell WSL to use it (this will let all devcontainers running in WSL “inherit” access to your credentials)
# on you windows host-machine
> wsl
# you are now in wsl
# set up your identity so git knows who you are
$ git config --global user.name "your name"
$ git config --global user.email your.email@example.com
# tell wsl to use the credential-helper, the path may vary slightly
$ git config --global credential.helper "/mnt/c/Program\ Files/Git/mingw64/libexec/git-core/git-credential-manager-core.exe"
Make sure you’re on
Sometimes WSL just isn’t able to reach the internet (where you will clone the git-repo from, pull down docker-images and dependencies from and push code-changes to). It doesn’t happen often, only on some machines, but I usually go into WSL to check it by running curl against some known hostname. If I get an error, it’s been enough for me to edit the name-server.
# in wsl
$ curl -I example.com
# if it fails: set a dns-server
# google's on 8.8.8.8 or cloudflare on 1.1.1.1
# always seem to work
$ sudo nano /etc/resolve.conf
Starting development
To actually start development I usually just open vscode to a recent project, but if you haven’t yet downloaded the project, or it’s slipped out of your list of recent projects:
# on your windows host-machine
> wsl
# in wsl
$ cd ~/code/where-your-project-is
# clone if necessary
$ git clone https://github.com/org/projec
$ cd project
$ code .
This opens code at the path in WSL, which discovers the .devcontainer/devcontainer.json (or you can add it) and asks you if you want to re-open in a devcontainer.
Pro et contra
The downsides are that it does take a little time getting used to, and you are losing some performance by running in a container instead of directly on your host-machine. If you try to run the containers bound against a windows file-system (i.e. skip the launching-from-wsl -part) your experience will be very slow, as the windows files and linux files don’t work the same way.
Upsides are that your environment is very contained, and re-creatable. It is easier to bring new developers into a working environment (no spending days getting them up and running) and you will no longer have developers with “special” setups that plain don’t work (or even worse – are the only ones that can compile some things).
I have gotten into the habit of re-building my environment at least weekly to make sure I don’t have a particular, special setup. If I find myself re-installing tools or extensions after every re-build I promote those to the setup in the devcontainers.json -file (or a script it calls), so it is repeatable.
If you find yourself with a setup that takes a long time to re-create because you install many things, or a setup that becomes unacceptably varied because you do things like call on apt-get to install things during creation: you might want to build your development-machine once and push that as a container-image that everyone can go from. This makes your setup even more repeatable.
Summary
This was a short-ish run-through of how to get devcontainers running, I really like this way of developing and have actually uninstalled most SDKs from my host-machine.